
This is an add-on board for the VUHFRadio module. Designed to fit on top of it inside the same enclosure. This module adds all the necessary functionalities to make the VUHFRadio a standalone portable radio/transceiver. It adds a graphics display with a button interface to change settings and show tracking variables, as well as a battery managing system with power path control and LiPo charging so that the VUHFRadio can be used unplugged and standalone. The module communicates with the VUHFRadio over a private UART interface and uses the same CAT commands, and TNC style KISS data protocol, as the VUHFRadio uses with the PC over USB.
This module also features a uSD Card slot and a resistive touch screen controller for possible future functionalities and application in other projects. For the same reason it also has the solder joints for a different TFT Screen interface, for a parallel interfaces on a 37-pin flat cable.
Version History
Revision 1
Schematic: RadioInterface_Schematic_V1.pdf
Gerber: RadioInterface_Gerber_V1.zip
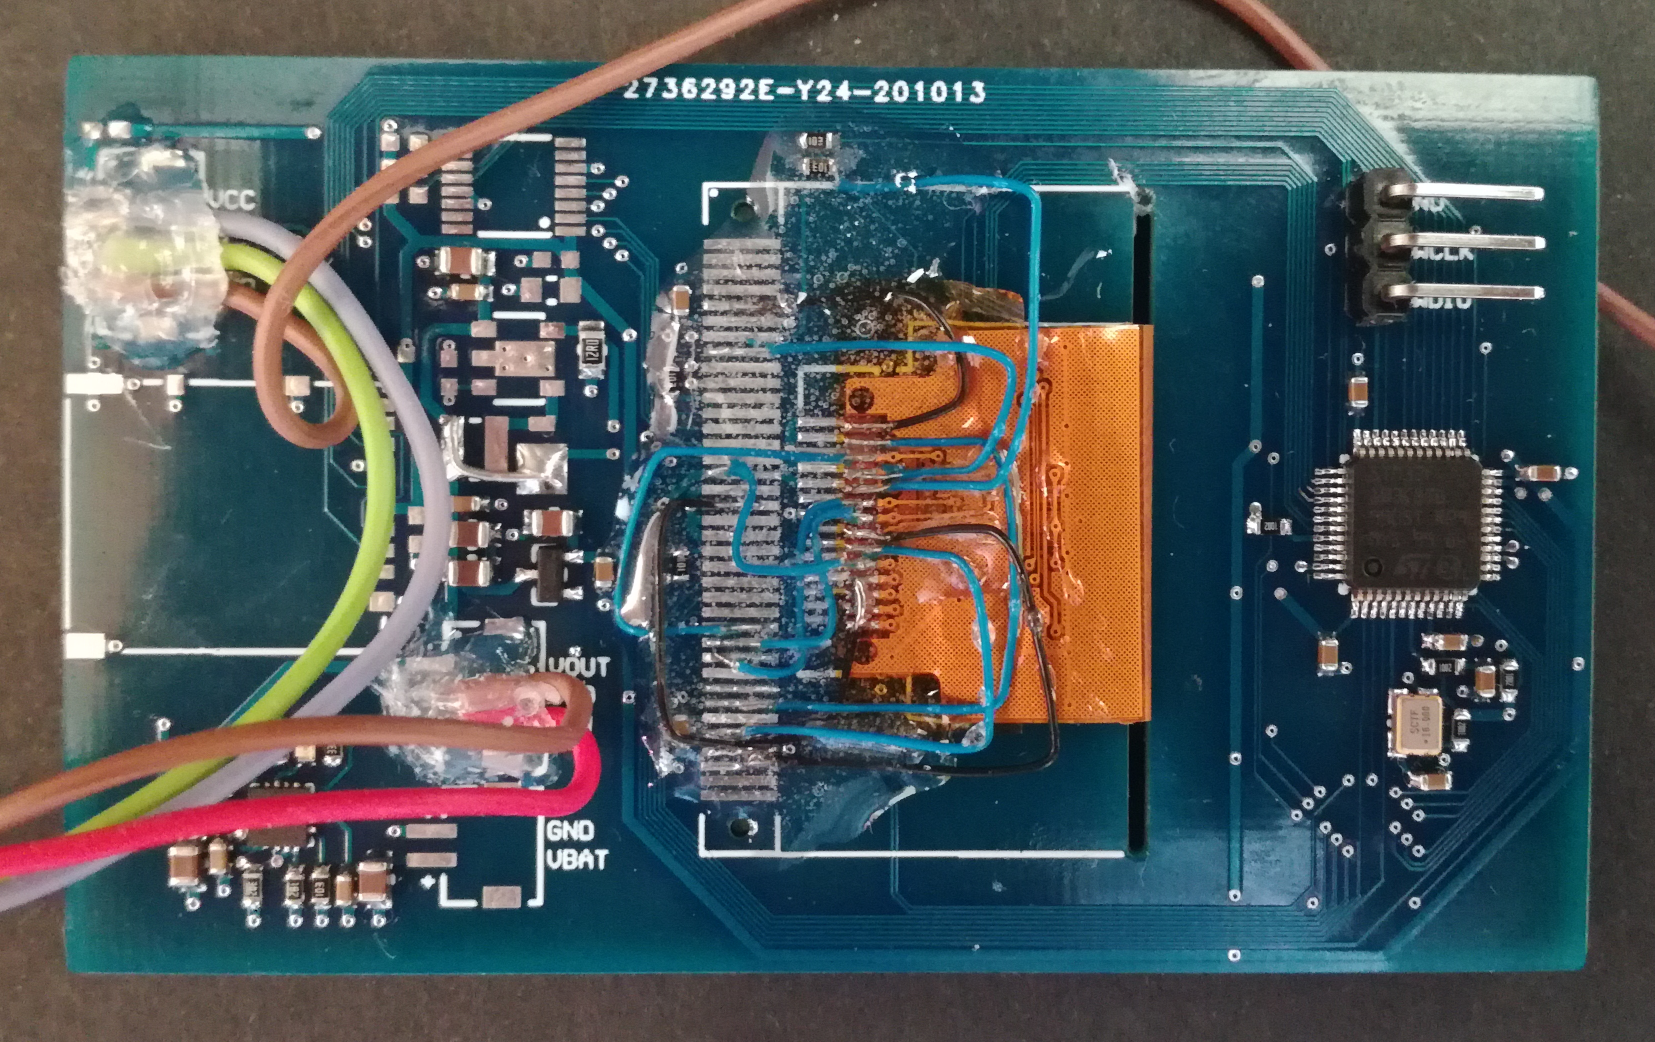
This is the first and current hardware version in development and under testing. As with any first version it has some mistakes. The main one is that the 14-pin flat cable solder connector on the board was not flipped/mirrored when moved to the bottom side of the PCB so it is inverted in relation to the TFT screen flat cable. To make it work all the pins are now connected with bodge wires and epoxy glued in place. This mess can be seen in the figure below.

Overview
The PCB is designed to have the same size as the VUHFRadio Module PCB and to be staked on top of that one inside the used aluminium enclosure. It is designed to carry a 2.2" TFT LCD. This LCD module fits perfectly inside the top cover of the enclosure with below 1mm to spare to either side. The distance between the PCB and the top of the enclosure, with the PCB in the top slot, is a bit over 2mm which is the height of both the LCD Module and the buttons used.
This add-on board is currently on the first Hardware version. The different functional blocks are arranged according to the figure below.
Battery Manager
This add-on module incorporates a LiPo battery manager IC, so that the VUHFRadio Module can be powered from a LiPo battery instead of the USB port. Because the VUHFRadio Module is not prepared for this addition, this circuit is separated from the rest and has it’s own connector to the VUHFRadio Module, for power in (VIN) and power out (VOUT). The battery managing circuit is designed to be installed in series with the USB power path of the VUHFRadio Module, in place of the Buck Converter.
The battery manager IC used is the BQ24230. This IC is a fully featured battery manager, capable of not only charging the battery but also power-path managing. This means that VOUT of the managing manager circuit, VOUT of the BQ24230, is not directly connected to the battery. When external power is applied this is routed directly to VOUT while also charging the battery. When no external power is applied the battery is connected to VOUT. In case the external power can not supply the required current, the battery manager IC can supplement VOUT with the battery. This power-path managing also allows it to deliver power to VOUT when no battery is connected or it is defective.
Both the external power current limit and charge current limit can be programmed with the use of a pare of resistors. For this Module, they are both set to the maximum of 500 mA. The battery manager IC also features thermal protection for the battery but this has been bypassed by installing a 10k resistor in place of a NTC Thermistor. The IC also features two open-drain outputs, one for charging indicating and one for valid input source present indicator, these are connected to two LEDs for status indication. In a future revision these outputs will also be routed to the MCU as well as battery voltage monitoring, both don’t exist in the current version.
The add-on module is powered from a 3.3V LDO connected to VOUT of the battery managing circuit.
MCU
The MCU used is the same as in the VUHFRadio Module, the cheap and ubiquitous STM32F103C8. Mainly chosen because it is very cheap, I already have a bunch of them and I used it before for driving a TFT with a ILI9341 controller. It is fast enough for quasi static graphics display but not for large fast changing graphics. The XO used is also the same as in the VUHFRadio Module, a 16 MHz XO.
Interface
The interface with the VUHFRadio is done over a UART interface with a baud rate of 115200. This connects to the UART expansion header on the VUHFRadio Module.
uSD Card
This module also features a uSD Card slot with a private SPI connection and SD card detection pin/line to the MCU. This was added for future use as there was space and a free SPI interface and pins on the MCU. This could be used in the future to save logs, configs, received messages, etc… It is located in a way so that the uSD Card can be made accessible from outside the VUHFRadio enclosure, on top of the USB and Audio Jacks.
TFT Screen
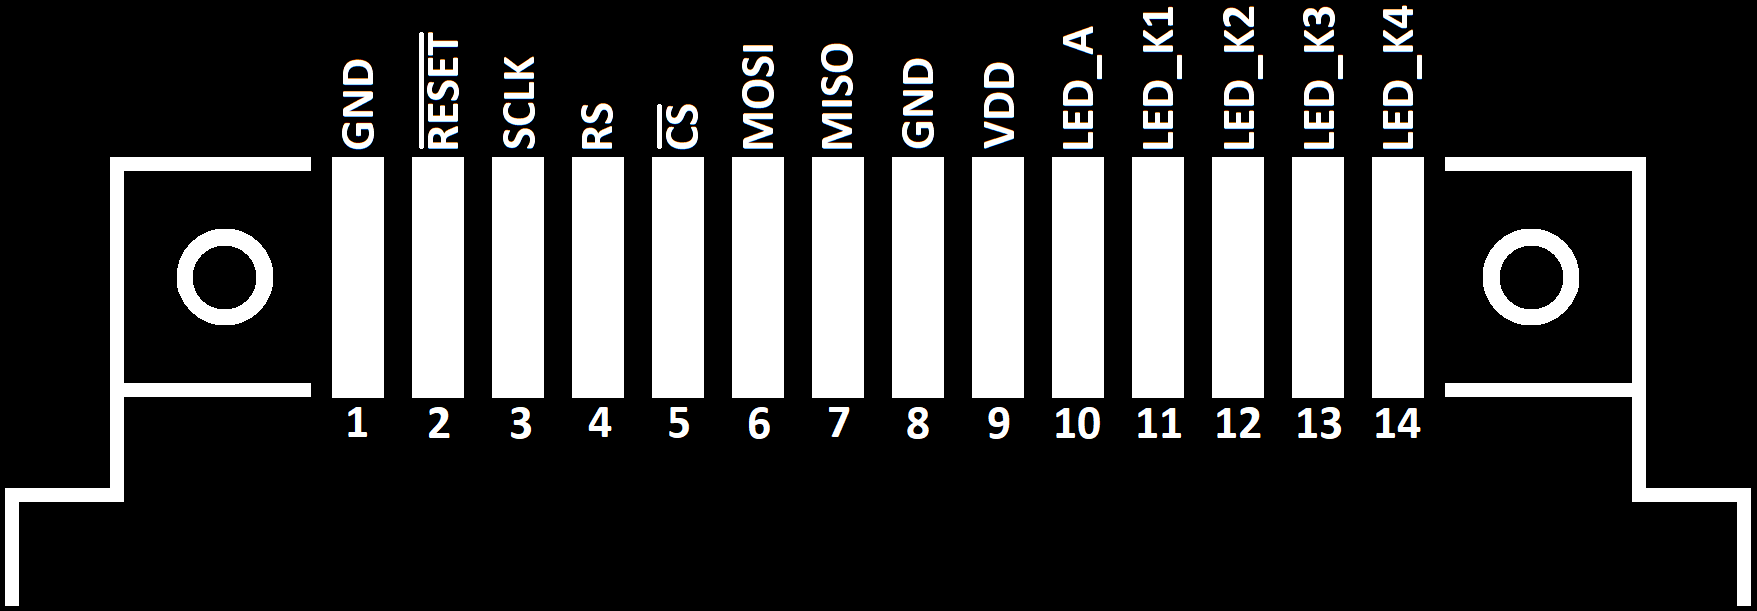
The add-on module was designed to carry a 2.2" TFT Screen with a ILI9341 controller and using a SPI interface over a 14-pin flat cable connection. Most 2.2" TFT Screen Modules found on eBay and AliExpress seem to use this 14-pin interface. They have a resolution of 320 by 240 pixels with 16 bit colors. Below is the pinout for this 14-pin interface:

The Module was also designed to optionally use 2.4" TFT Screens, or larger, that use a parallel interface on a 37-pin flat cable connector. This 37-pin connector also carries 4 signal pins used by an optional resistive touch element. The parallel interface is connected for a 8-bit wide use to the MCU. Below is the pinout of this 37-pin interface, with highlighted in red the pins used for the 8-bit wide parallel data bus.

The backlight control for the TFT Screen is handled by the PT4110 step-up LED Driver. The use of this LED Driver allows for a more efficient backlight control then a simple series resistor and also dimming of the backlight with the use of pulsed/strobe backlight with a PWM signal applied to the EN pin of the PT4110.
Although this module is intended to be used without a touchscreen, a touchscreen controlled was added to give it the option for future use. The touchscreen controller added is the TSC2007, a resistive touchscreen controller with a I2C interface, interrupt support (Touch Detected) and 12-bit resolution.
Input Interface
The input interface is done with 9 buttons arranged in a row of 4 screen menu buttons and 5 buttons arranged in a D-Pad with a center button. The buttons used are small 3x4mm SMD buttons with a height of 2mm, which is exactly the clearance that exists between the top of the VUHFRadio enclosure and the PCB. Each button has a 10k pull-up resistor, making them active low, and no debouncing circuit/capacitor was added, the debouncing is done in software.
Costume drivers for both the TFT Screen and the MCU peripherals where developed. The peripheral drivers use the Low Level libraries from STM. A simple 2D Graphics Library was also developed for drawing basic shapes (lines, rectangles, circles) and text as well as the necessary ILI9341 driver.
The communication protocol used to interface with the VUHFRadio uses the same CAT command interface used to communicate with the VUHRadio Module over USB, but here over a proprietary UART interface. In digital modulation mode this UART interface also carries the received, and to transmit packets, using a low level TNC protocol called KISS.
The full software is available on Github: RadioInterface
The GUI is built on top of a custom and simple 2D Graphics Library. Both the GUI interface as well as the 2D Graphics Library are still in development, with the basic layout, feel and features implemented and working.
Below is a semi-interactive copy of the GUI with hover drop-downs:
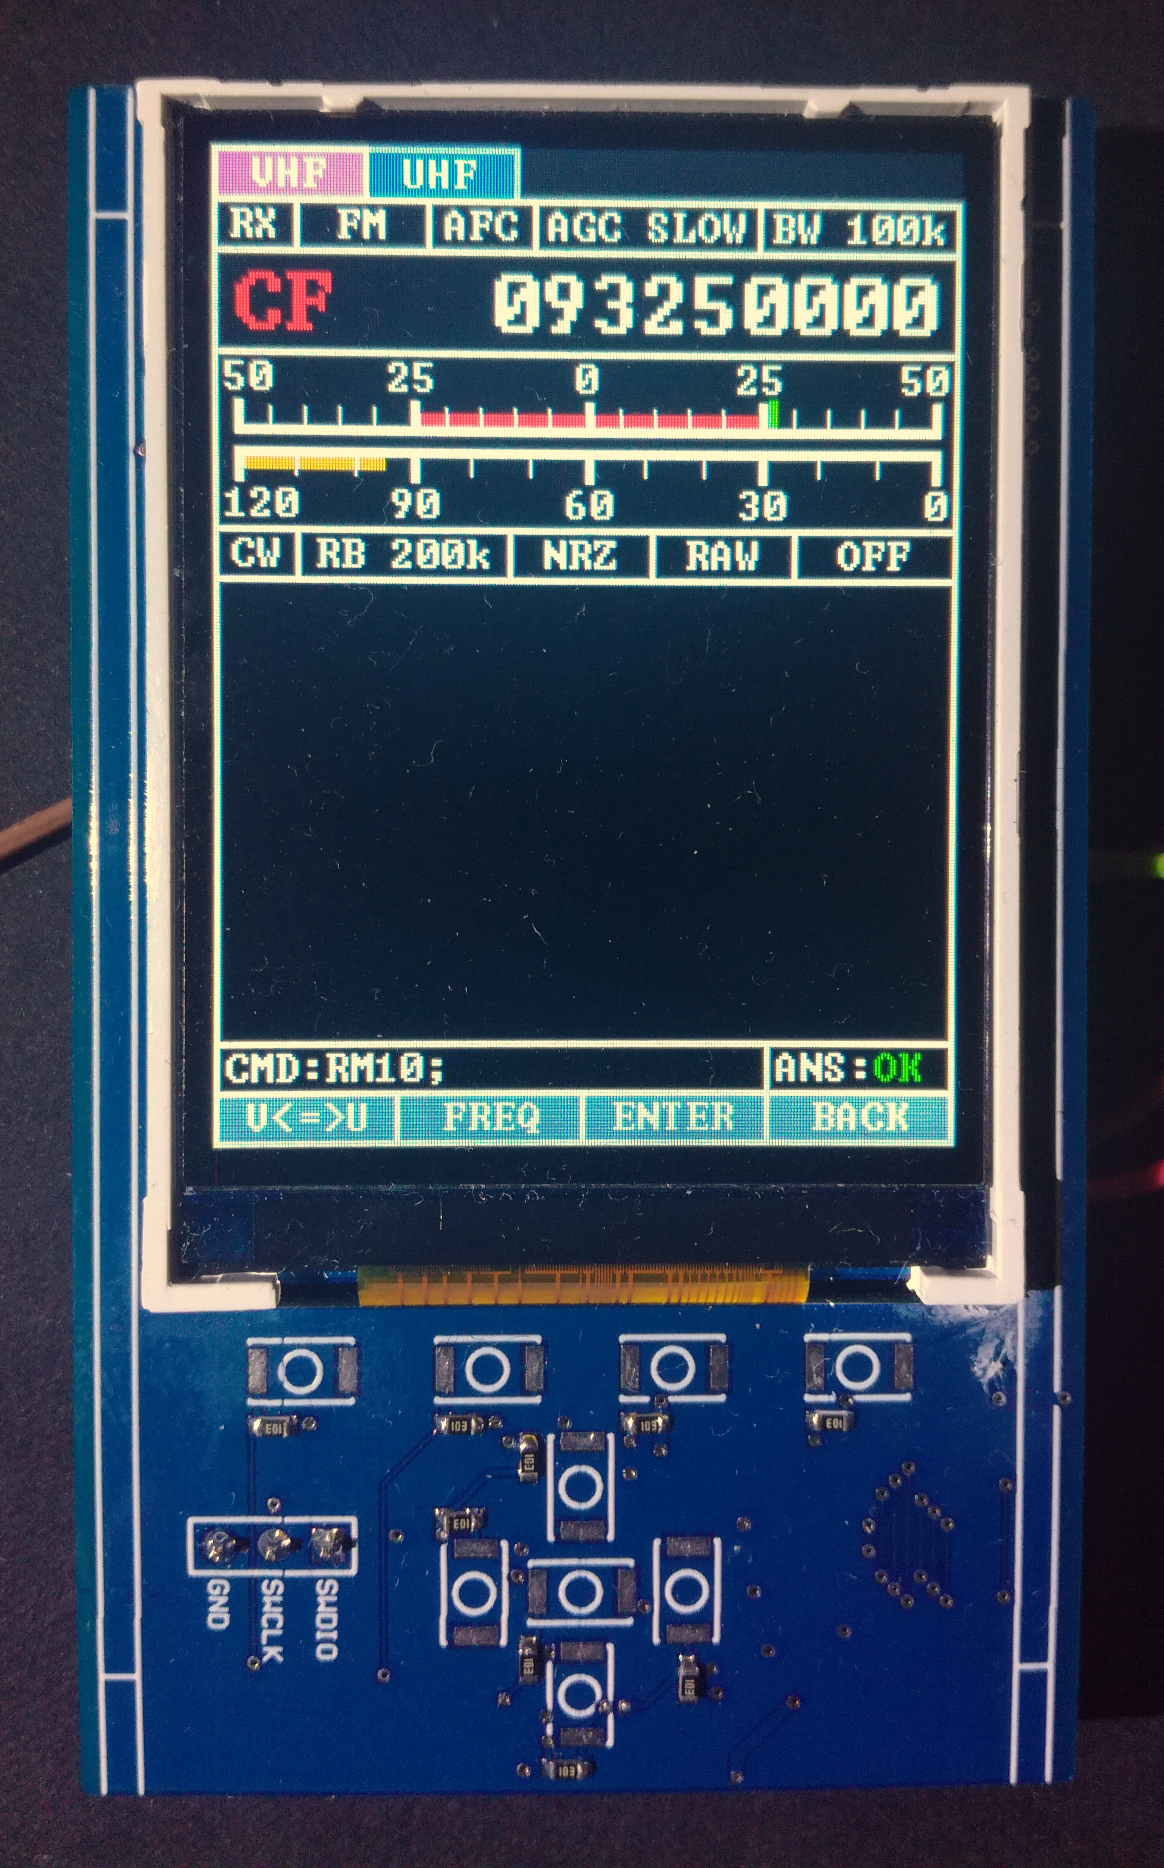
The GUI is divided into 8 areas/rows. The meaning of each of this areas/rows are listed below, from top to bottom:
- The top row is the Radio selection Tab that indicates which radio is currently displayed/controlled.
- The second row this is the Analog Control row. This row has the main radio controls for the analog and RF domain of the transceivers like operation mode, modulation and RX bandwidth.
- The third row is the Center Frequency indicator and control for the transceiver.
- The forth row is the RX tracking indicator bars. On the top is a ruler that displays the RX bandwidth with a AFC range bar in red and the RF tracking frequency offset, thick green line. The ruler is centered on the RF center frequency and the ruler unit is in kHz with negative values to the left and positive to the right of the center. Below this is the RSSI tracking bar, displayed in -dBm.
- The fifth row is the Digital Control row. This row has the main radio controls for the digital, bits and packet, domain of the transceiver like Morse decoding (CW), datarate/bitrate and encoding.
- The large center window is used to display received packets information. The received packets with the KISS protocol are AX.25 decoded and displayed.
- The seventh row displays the last sent command to the Radio, over the UART interface, and the return status of that command.
- The last row is used as labels for the top row of buttons, the menu button row.
Navigation of the GUI is mainly handled by the D-Pad. Switching from the Analog Control row to the Digital Control row is done with the UP and DOWN buttons and selecting the menu inside a row with the LEFT and RIGHT buttons. The selected menu is highlighted by a red frame/boarder. The center button can then be used to open/access that menu and to confirm a new selection/configuration. The BACK button (4th button) on the menu button row is used to exit a menu without changes, to cancel a selection.
To switch between the two radios, the V<=>U switch button (1st button) of the menu button row is used. To access the control and change the Center Frequency, the FREQ button (2nd button) of the menu button row is used.
Waterfall
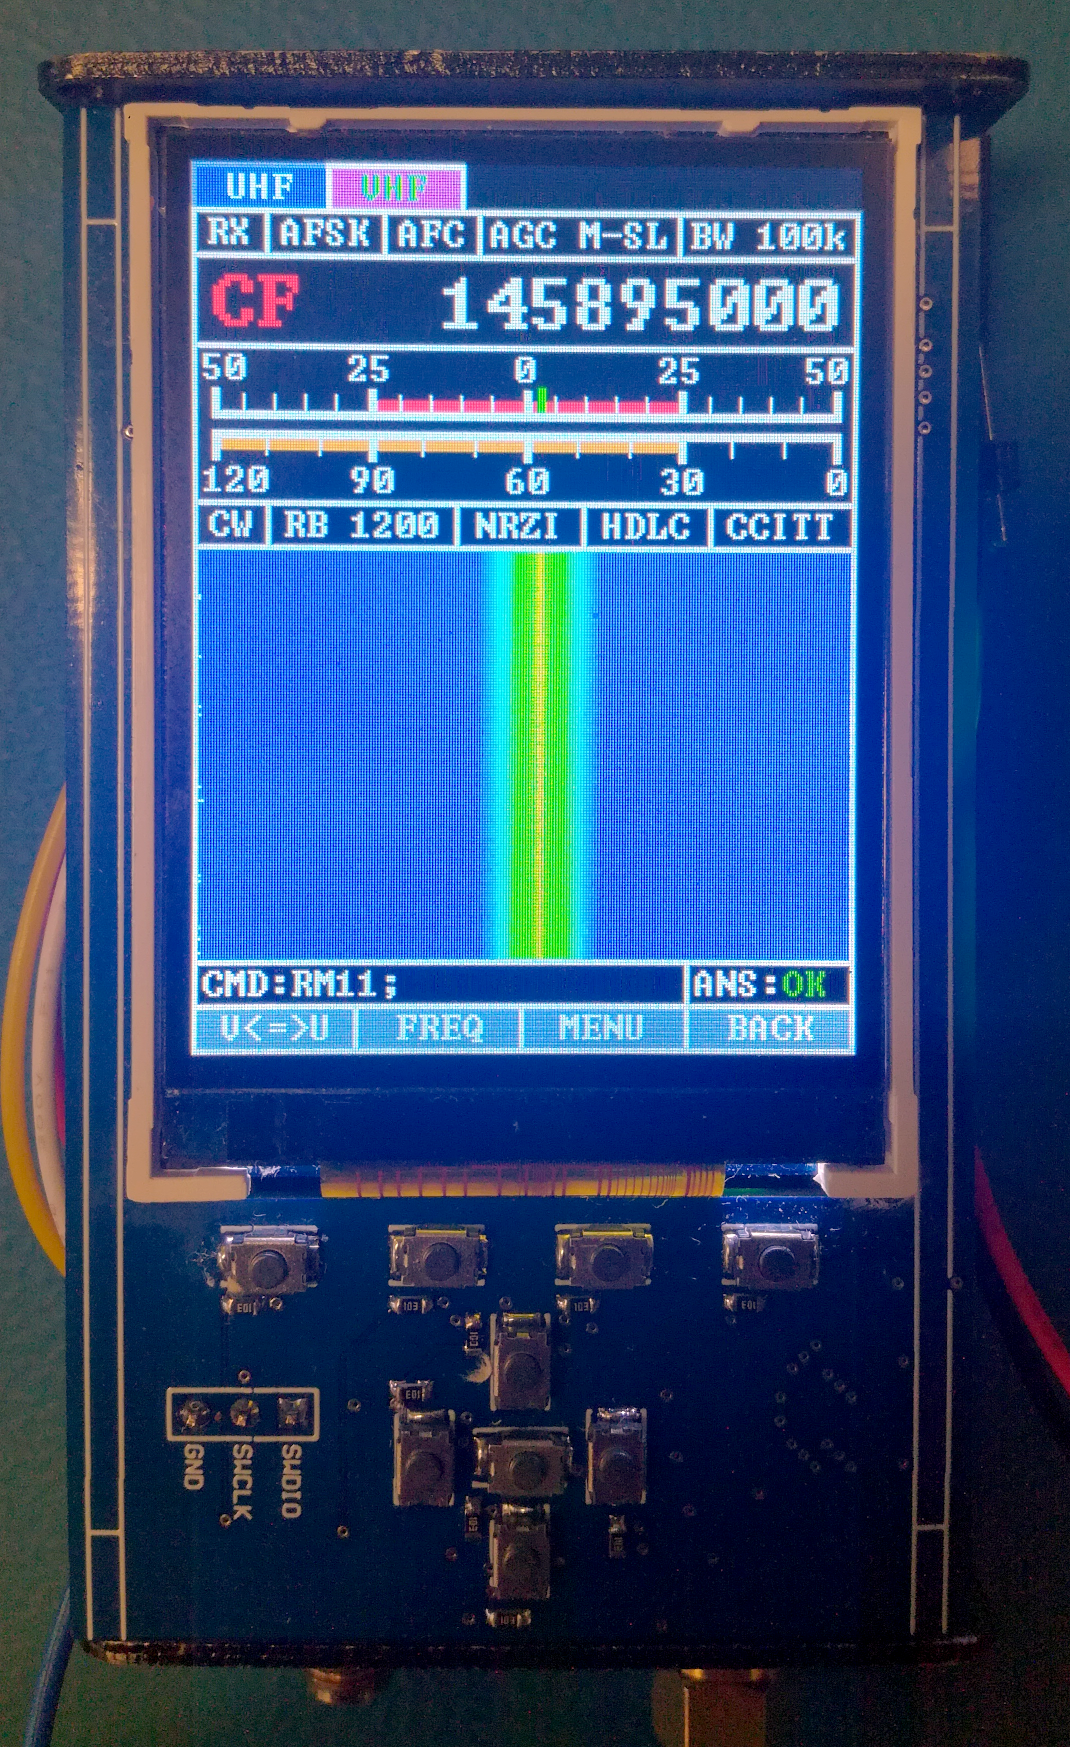
As the VUHFRadio module provides both RF frequency offset and RSSI tracking, which are already used for both the RSSI and AFC tracking bars, it is possible to create a simple Waterfall window. By using these two variables, and adding a linear decay to the RSSI for a spectrum effect, it is possible to create a pleasing Waterfall. Although it is not perfectly accurate, as no actual spectrum is obtained, it still is very useful to see the change of both RSSI and RF Frequency offset over time. The frequency band of the spectrum window, start and stop frequencies, is updated with the change of the RX Bandwidth and lines up with the AFC tracking bar.

The RSSI strength is indicated by the color of the Waterfall, where the central point is the actual RSSI value returned by the VUHFRadio module and to either side a fictional linear decay. The RSSI is encoded into a color by use of a linear gradient that starts at blue (0x0000FF) , for a RSSI value of -128 dBm and passes through cyan (0x00FFFF) , green (0x00FF00) , yellow (0xFFFF00) and stops at red (0xFF0000) , which represents a RSSI value of 0 dBm. This gradient can be seen in the figure below:

The Waterfall window has vertical scrolling so that the newest entry is always at the top, as is costume with Waterfall windows. This vertical scrolling has to be implemented in software as the hardware scrolling feature of the LCD (ILI9341), which can do vertical scrolling in the correct direction and orientation, doesn’t modify the actual GRAM content and therefore, when the vertical scrolling mode is exited, the scrolling gets lost.
The software vertical scrolling is achieved by reading one line/row and writing it back one line further down, starting at the bottom and going up so to not loose any lines in the process. At the end, the new information/spectrum is written as the top line. The current implementation takes around 140ms to refresh the whole Waterfall window, which is 236 by 148 pixels. The theoretical fastest time for this operation is around 50ms, reading/writing 236x148 pixels twice with each 3 bytes of color information and a SPI clock of 36MHz, so there is still room to improve it further. Currently the Waterfall refresh rate is fixed to 5Hz, every 200ms, to give time to draw/update other parts of the screen and perform other tasks.
Below is a clip showing the Waterfall window with a simple frequency sweep at the VUHFRadio modules input. It can be seen that it tracks and shows the frequency shift pretty accurately, besides a slight offset due to the oscillator used in the VUHFRadio module.